


If you are a spindle spinner then you know the struggle of trying to ply. It’s not terribly hard, it’s just not necessarily as smooth as plying on a wheel with bobbins and a lazy kate. Not to mention that you would need more than one spindle to ply which can get expensive if you are spinning on a budget like I was when I first started spinning. The first I heard of plying on the fly was from Kristin of the yarngasm podcast. She explained how she would ply as she is spinning and that way, all you would need is one spindle, and some fiber to spin which is the most budget friendly way to ply. After I had heard about this technique, I immediately tried it to save the expense of having to buy another spindle. It was all over after that. I was hooked! I have since tried other plying techniques on a spindle and I have to say that plying on the fly is my favorite and the technique I use most often. Then after I am done with my roving, all I have to do is skein it up. I’m not going to lie, this technique does take longer and requires more patience but overall typically leads to a better product, a more durable product, and is less expensive.
Step One: Attaching the Leader
You will need to obtain about a foot and a half to two feet of preferably a non superwash wool yarn. This will be your leader yarn. You will also need a drop spindle. I bought my first spindle from Paradise Fibers. We actually make artisan spindles in store and are gorgeous and so well balanced. You will need to tie your leader to your spindle. Click here to see how to attach your leader to your spindle and get started spinning with your fiber.
Step Two:  Creating the Slip Knot
Once you have attached your leader and spun about three feet of yarn, you will need to create a slip knot at the bottom where the newly created yarn attaches to the leader. Keep the slip knot open and pull the newly created yarn through the slip knot and begin to chain ply. Click here for a video on how to chain ply on your spindle.
Step Three: Plying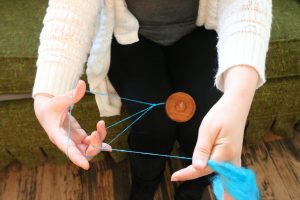
After you have chained the newly created yarn. You will need to spin in the opp
osite direction usually counter clockwise, while holding the chain open. I like to slip the open chain on my pinky finger while I am plying. Spin until the chained yarn no longer has twist and lays limp.

Step Four: Winding and Continuing
Wind the newly chained and plyed yarn on the spindle handle keeping the chain still open on your pinky. Slip the open chain loop on the hook of your spindle once you have run out of yarn to wind. Hook the working single ply strand on the hook and continue drafting and spinning. The hook should keep the chain loop open and held so you can continue chaining and plying once you have spun up another three or so feet of single ply yarn.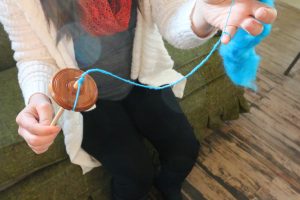
If you are just beginning to spin or are thinking of spinning, I would recommend a roving that is easy to spin such as the Malabrigo Nube or the 64 count Merino Roving we have at the shop. I have spun with both of these and they are incredibly smooth and easy to spin for any beginner spinner. I am also writing each week about different sheep breeds and how their wool behaves dyed and spun. Be sure to check that out each week for more information on sheep breed wools. Feel free to post pictures of your newly created ply on the fly yarn on our Facebook page. We would love to see what you all are creating! Good luck!


